Fingerprint sensor for Raspberry Pi and Debian Linux (Update 8)
Written by Bastian Raschke.
Published 2015-03-17 in the category Raspberry Pi.
Available translations: de
In university my team and me got the challenge to find a cheap solution to use a fingerprint sensor native on the Raspberry Pi to include this in a bigger project. After some research we found a low-priced hardware module that is rather known in the Arduino environment.
You can find a pretty cool demonstration video below:
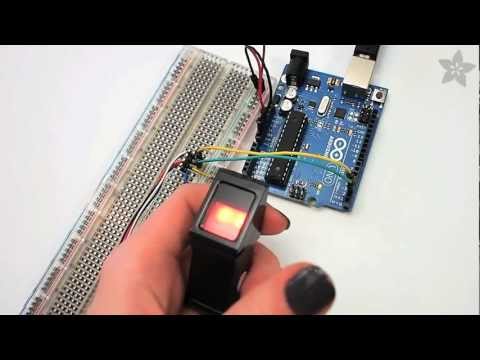
Adafruit the creator of the video offers the sensor hardware and additionally provides some documentation (not really much) and an Arduino sketch on Github. The Arduino sketch demonstrates the basic functionality of the sensor. Our plan was to create a possibility to use the sensor hardware really easy on the Raspberry Pi and later generally on Linux. The Arduino sketch does not run on the Raspberry Pi, so we had to create something new.
My part in the project was to create of the sensor library/driver. I chose the programming language Python because it is recommend for the Raspberry Pi, easy to use and provides a huge number of libraries for misc stuff. Additionally Python is available out-of-the-box in nearly every Linux distribution. After that decision, I read the C++ code of Adafruit. The documentation of the producer ZhianTec helped me a lot to understand the protocol. Unfortunately the newest version of the documentation (2.0) is only available in Chinese, so I used a bad Google-Translate-English version with a totally broken “layout” - but better than nothing ;)
Overview fingerprint sensor
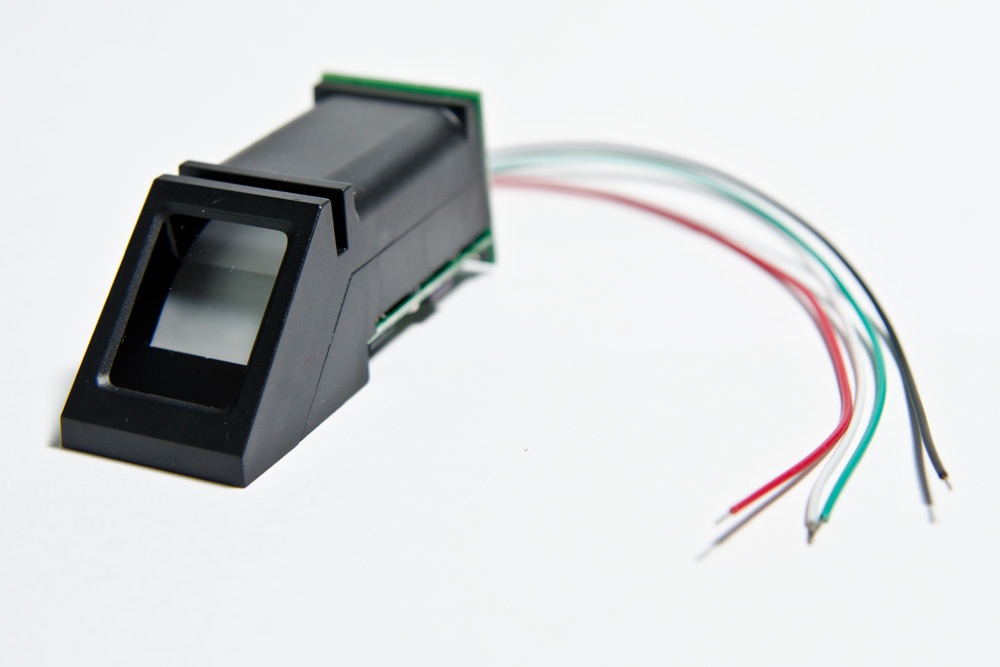
Producer: ZhianTec
Model: ZFM-20 (also known as “Arduino fingerprint sensor”)
Communication via: UART
Protocol: simple request-response protocol
Price: 35 to 75€ depending of distribution source
Connecting the fingerprint sensor
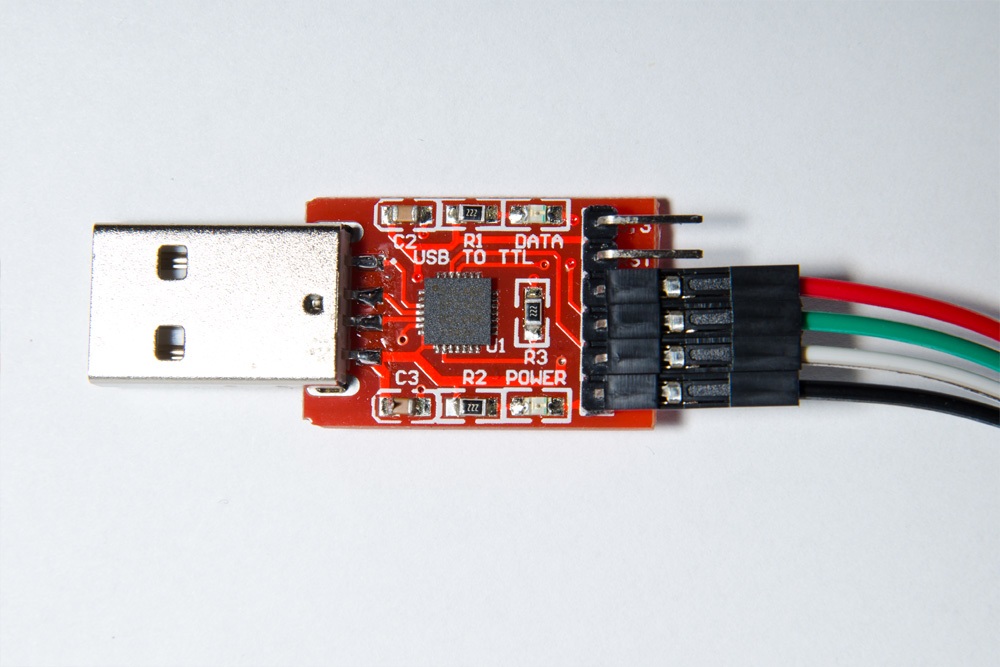
The Raspberry Pi already has 2 GPIO pins for UART, so we are able to connect the sensor directly to the Raspberry Pi (according to the datasheet, the logic high level of the sensor (3,3V) is not to high for the mini computer). But, it is also possible to use an USB-TTL converting board (e.g with a CP2102 chip) that only cost a few Euros and connects the sensor wires comfortable with the USB of any computer (in our case the Raspberry Pi).
The connection of both devices:
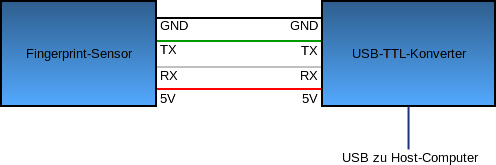
We connect the power supply (red wire) to the 5V pin of the converter, the ground (black wire) to ground/GND pin. The transceiver data wire (green wire) of the sensor to the TX pin of the converter and the receiver data wire (white wire) to the RX pin.
Note: The data wires of some USB-TTL converting boards (specifically the USB-wire versions) must be connected the other way round. If no communication happen, simply try to exchange the data wires.
Software installation
Now we have to prepare the software stuff.
First (if not already done), you have to add the PM Codeworks repository to your system:
~$ echo "deb http://apt.pm-codeworks.de wheezy main" | sudo tee -a /etc/apt/sources.list
Afterwards, you have to install the suitable GPG signing key to be sure of the integrity of the packages:
~$ wget -O - http://apt.pm-codeworks.de/pm-codeworks.de.gpg | sudo apt-key add -
After an update of the local packages sources, you are able to install the fingerprint package:
~$ sudo apt-get update
~$ sudo apt-get install python-fingerprint
If you connect the fingerprint sensor via converting board with your Raspberry Pi, the device should become available via the path /dev/ttyUSB0. For default only the root user is able to use serial devices. To make sure that the normal user (e.g. “pi”) is able to use the fingerprint sensor, you have to add him to the user group “dialout”:
~$ sudo usermod -a -G dialout pi
Now your have to restart your system.
The first test
So let's start with the first test: Connect the fingerprint sensor via converting board to your Raspberry Pi and change to the example directory of the fingerprint library:
~$ cd /usr/share/doc/python-fingerprint/examples/
For example, test the “index” program (it lists the available fingerprint slots):
~$ python2 ./example_index.py
Everything works fine if you get the following output:
Currently stored templates: 0
Please enter the index page (0, 1, 2, 3) you want to see:
Now you can choose a page number between 0 and 3:
If a message occurs like:
The fingerprint sensor could not be initialized!
Exception message: The fingerprint sensor port "/dev/ttyUSB0" was not found!
The sensor has not been recognized by the system. Maybe it is not connected correctly (check the data wires) or the device is available via an other path than /dev/ttyUSB0.
If everything works, you are able to use all existing features provided by sensor hardware: To enroll a finger (read and save it) you can use the example_enroll.py program. To check if a finger is already enrolled, you can use example_search.py. To delete a finger you use the example_delete.py program.
Further information
Here you can find some useful information and documentation additionally.
Purchase of the fingerprint sensor
Ebay
Search “Arduino fingerprint sensor”.
Pro: cheap (about 35€)
Contra: long delivery time from asia (about 3-4 weeks to Germany)
Adafruit Industries
Pro: much cool stuff in the webshop
Contra: expensive; long delivery time from USA to Germany
Other distributors
Pro: short delivery time (dependent on country)
Contra: Mostly expensive (>60€)
Purchase of the converting board
Ebay
- Search “USB TTL CP2102”:
Small and cheap USB-TTL converter board (good for testing proposes).
Price: about 2-5€ - Search “USB TTL wire”:
Practical, robust USB wire with integrated converter.
Price: about 5-10€
If you choose the first option, you should additionally buy some male-male jumper wires to connect the devices quick and simple. The jumper wires are available in 40pcs/pack for about 5€. But if you have an old computer, I suggest to recycle the old power/reset switch jumper cables or LED cables.
General note: If possible, do not choose delivery from Asia to avoid long delivery time.
Documentation fingerprint sensor
- Version 2.0 (Google-Translate English)
- Version 2.0 (Chinese)
- Version 1.4 (English)
Manual download of the library
- PyFingerprint 1.4 (2016-05-22)
(SHA-256:9b0129fa2beac2c416e10d0b4d4ed8eb0d4f2e142bc7225fe937f198fc77edf4und GPG signature)
Source code available on Github
The library is available on Github:
Frequently asked questions (FAQ)
Because people ask us the same questions really often, I added a FAQ sections for the most common problems:
#1 The sensor is not recognized
When you get the message The fingerprint sensor could not be initialized! from the library there are multiple reasons for this issue:
- The sensor was not found on given port
- The USB-TTL converter is not working properly
- The data wires (TX, RX) between the sensor and the USB-TTL converter are not connected correctly
- The sensor is not compatible with the library (not a ZhianTec model?)
Of course you can try the following solution for each possibility:
- Change the port from
/dev/ttyUSB0to correct port - Try another USB-TTL converter (the chipset CP2102 is working well)
- Exchange the data wires and use other cables
- Sorry maybe you bought the wrong model? Try another sensor
#2 I want to store the fingerprint templates outside of the sensor (e.g. in a database or on the Raspberry Pi). Is that possible?
It is possible to download (export) and upload (import) fingerprint templates. But for recognition the sensor needs the templates on the sensor. So if you want to sync the templates between multiple sensors, it is possible. But if you want to store the templates outside of the sensor and use it for recognition, it is not possible.
#3 I'm a absolute beginner. Can you write a script for me?
Often I got impertinent emails from people: They want me to write their dream project based on nothing (no concept, no information, no clue). And of course it is urgent as well. I like to provide the library for the sensor and some example scripts and if anybody unexperienced ask me a question that is not answered here, of course I will help. But I'm not a social service, writing software without payment for impertinent acting people.
#4 I have a problem with the library, can you help me?
Often I got emails without any error messages or context. Sorry, but without information we are not able to help.
Update 1: New version 1.1
I added the missing image scanning method to the library. This method provides the possibility to download the images of a scanned finger to your host computer. You can check out the example program example_downloadimage.py to test this nice feature. The image will be saved as a grayscale bitmap. Furthermore the library can be installed fully automatically via the PM Codeworks repository.
Update 2: New version 1.2
We updated the library according to the Python module conventions of Debian. Furthermore we updated the code to our current knowledge and experiences.
Update 3
We updated the library to our newest programming conventions. Furthermore we added a license file.
Update 4
Many thanks to Danylo Esterman (see comments of the german Post) for the hint that the sensors logic high level is 3,3V instead of 5V. Therefore an USB-TTL converting board is not required to use the sensor with the Raspberry Pi.
Update 5: New version 1.3
Many thanks to David Gilson (see comments) for his implementation of the method uploadCharacteristics which finally allows you to upload fingerprint characteristics you downloaded before. Furthermore thanks to Danylo Esterman for his improvement idea of the method downloadImage to get a better quality Bitmap image.
Update 6: Source code available on Github
From this day on, the project will managed fully transparent via Github instead on my private Mercurial server. Changes or feature requests can be done directly via Github.
Update 7: New version 1.4 and compatibility to Raspberry Pi B+ and Raspberry Pi 3
In this new version, I fixed the wrong count of maximum storable templates on the ZFM-20 (the A model stores 162 exactly). The wrong previous value caused some trouble with the new ZFM-60 model (thanks to Florian Scharf for this hint).
Additionally Florian got the ZFM-60 sensor working with the Raspberry Pi B+ and the Raspberry Pi 3 by editing the file /boot/cmdline.txt.
For the Raspberry Pi B+ you need to change the following line:
dwc_otg.lpm_enable=0 console=serial0,115200 console=tty1 root=/dev/mmcblk0p2 rootfstype=ext4 elevator=deadline fsck.repair=yes rootwait
to the line below (the part console=serial0,115200 must be removed):
dwc_otg.lpm_enable=0 console=tty1 root=/dev/mmcblk0p2 rootfstype=ext4 elevator=deadline fsck.repair=yes rootwait
For the Raspberry Pi 3 you need to add the following line furthermore (this disables the onboard Bluetooth chip that allows you to use the UART interface UART0/ttyAMA0 on GPIO 13 and 15 like on previous Raspberry Pi models, but it disables the Bluetooth functionality of course):
dtoverlay=pi3-miniuart-bt
After saving the file and restart, the sensor should work properly.
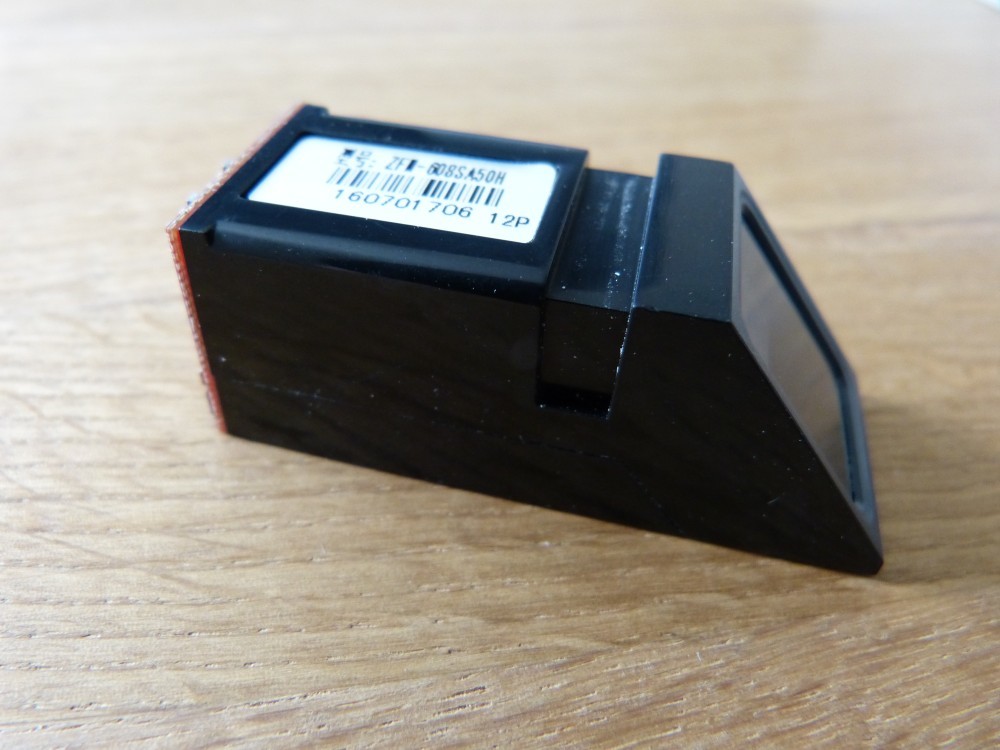
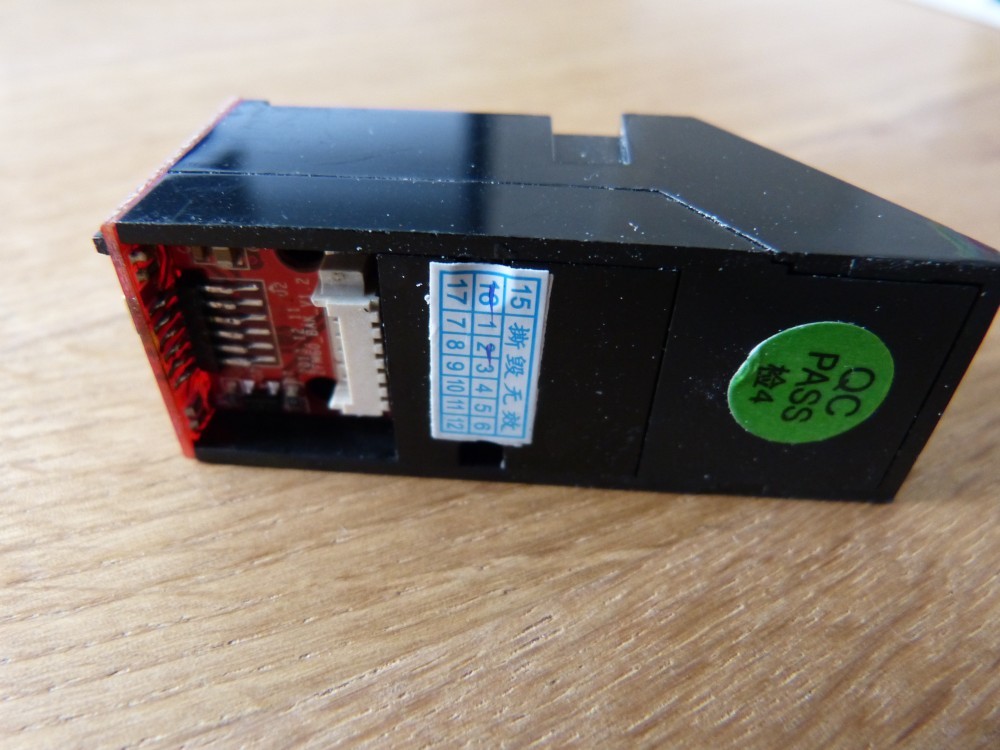
Florian sent me this pictures of the ZFM-60 sensor:
Have fun to tinker with the new sensor model or Raspberry Pi :-)
Update 8: Added FAQ
I added a FAQ for the most common problems with the sensor/library.
Tags: Raspberry Pi, Debian, Fingerprint, Sicherheit